
Highlights §
- The model, also called checkpoint, is the brain of your AI, designed for the purpose of producing certain types of images. There are many options, most of which are on civitai. But which to choose? These are my recommendations: (View Highlight)
- Please note that checkpoints in the format
.safetensors are safe to use while .ckpt may contain viruses, so be careful. Additionally, when choosing models you may have a choice between fp32, fp16 and pruned. They all produce the same images within a tiny margin of error, so just go with the smallest file (pruned-fp16). If you want to use them for training or merging, go with the largest one instead. (View Highlight)
- The VAE is a small separate model, which “converts your image into human format”. Without it, you’ll get faded colors and ugly eyes, among other things. (View Highlight)
- One important technique when writing prompts are emphasis and de-emphasis. When you surround something in
(parentheses), it will get more emphasis or weight in your resulting image, basically telling the AI that part is more important. The normal weight for every word is 1, and each parentheses will multiply by 1.1 (you can use multiple). You can also specify the weight yourself, like this: (full body:1.4). You can also go below 1 to de-emphasize a word: [brackets] will multiply by 0.9, but you’ll still need parentheses to go lower, like (this:0.5). (View Highlight)
- Sampling method: This is the algorithm that formulates your image, and each produce different results. The default of
Euler a is often the best. There are also very good results for DPM++ 2M Karras and DPM++ SDE Karras. (View Highlight)
- • Sampling steps: These are “calculated” beforehand, and so more steps doesn’t always mean more detail. I always go with 30, you may go from 20-50 and find consistently good results. See below for a comparison.
• Width and Height: 512x512 is the default, and you should almost never go above 768 in either direction as it may distort and deform your image. To produce bigger images see
Hires fix. (View Highlight)
- CFG Scale: “Lower values produce more creative results”. You should almost always stick to 7, but 4 to 10 is an acceptable range. (View Highlight)
- Hires fix: Lets you create larger images without distortion. Often used at 2x scale. When selected, more options appear:
• Upscaler: The algorithm to upscale with.
Latent and its variations produce creative and detailed results, but you may also like R-ESRGAN 4x+ and its anime version. More explanation and some comparisons further down ▼.
• Hires steps: I recommend at least half as many as your sampling steps. Higher values aren’t always better, and they take a long time, so be conservative here.
• Denoising strength: The most important parameter. Near 0.0, no detail will be added to the image. Near 1.0, the image will be changed completely. I recommend something between 0.2 and 0.6 depending on the image, to add enough detail as the image gets larger, without destroying any original details you like. (View Highlight)
- LoRA or Low-Rank Adaptation is a form of Extra Network and the latest technology that lets you append a sort of smaller model to any of your full models. They are similar to embeddings, one of which you might’ve seen earlier ▲, but Loras are larger and often more capable. (View Highlight)
- Lycoris ▲
LyCORIS is a new development that lets LoRAs learn more layers. Learn about it here. You’ll need this extension to use them.
As of now there are 2 new LoRA types:
• LoCon - Said to be good with styles
• LoHa - Said to be good with styles that also contain characters
You can make your own in the trainer further down ▼. (View Highlight)
- As mentioned in Generation Parameters ▲, normally you shouldn’t go above 768 width or height when generating an image. Instead you should use
Hires fix with your choice of upscaler and an appropiate denoising level. Hires fix is limited by your VRAM however, so you may be interested in Ultimate Upscaler ▼ to go even larger.
You can download additional upscalers and put them in your stable-diffusion-webui/models/ESRGAN folder. They will then be available in Hires fix, Ultimate Upscaler, and Extras. (View Highlight)
- The colab in this guide comes with several of them, including Remacri, which is a great all-around upscaler for all sorts of images.
• A few notable ones can be found here.
• LDSR is an advanced yet slow upscaler, its model and config can be found here and both must be placed in
stable-diffusion-webui/models/LDSR.
• The Upscale Wiki contains dozens of historical choices. (View Highlight)
- Ultimate Upscaler ▲
An improved version of a builtin script, it can be added as an extension ▲ and used from within img2img. Its purpose is to resize an image and add more detail way past the normal limits of your VRAM by splitting it into chunks, although slower. Here are the steps:
- Generate your image normally up to 768 width and height, you can then apply hires fix if you are able to.
- From txt2img or the Image Browser extension send it directly into img2img, carrying its prompt and parameters.
- Set the Denoising somewhere between 0.1 and 0.4. If you go higher you most likely will experience mutations.
- Go down to Scripts and choose Ultimate SD Upscale. Then, set your parameters like this, with your desired size and upscaler, and the “Chess” Type:
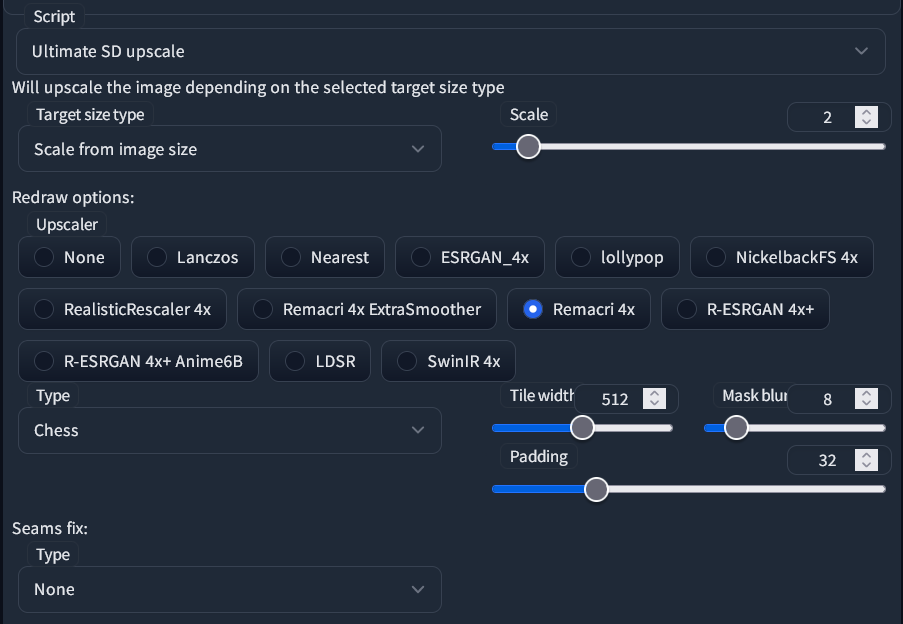 • If you have enough VRAM, you may increase the Tile width as well as the Padding. For example, doubling both of them. Tile height can remain at 0 and it’ll match the width.
• It is not necessary to set the Seams fix unless you encounter visible seams between regions in the final image.
• If you have enough VRAM, you may increase the Tile width as well as the Padding. For example, doubling both of them. Tile height can remain at 0 and it’ll match the width.
• It is not necessary to set the Seams fix unless you encounter visible seams between regions in the final image.
- Generate your image and wait. You can watch the squares get sharper if you have image previews enabled. (View Highlight)
- ControlNet is an extremely powerful recent technology for Stable Diffusion. It lets you analyze information about any previously existing image and use it to guide the generation of your AI images. We’ll see what this means in a moment. (View Highlight)
