
In these notes, I am sharing my current workflow for using LoRas to generate images of myself and my loved ones. The goal is to offer practical insights into what works best and areas that need improvement.
This post is intended not only as a reference for my future self but also as a knowledge-sharing platform for my colleagues. We all have some working knowledge about Diffusion, Attention Mechanisms, etc. If you need a refresher, I strongly recommend learning more about Stable Diffusion technicalities.
SD15 vs SDXL
Currently, this post focuses on Stable Diffusion 1.5 as part of my slow-paced learning journey. Before advancing to SDXL, I aim to explore the full potential of SD15.
Now let’s delve into the tech stack so we can swiftly move on to more engaging topics:
- MacBook Pro environment preparation
- Kohya
- Automatic1111
Presently, both training and inference are run on my laptop. However, if you wish to migrate these tasks to a Cloud service, I’ve heard great things about Runpod, Paperspace, or you could even try Colab.
Training the LORA
Dataset Preparation
Collecting Images
To train your LORA effectively, you’ll need an assortment of pictures. Quality and variety are key factors here. You should aim for different facial expressions, clothing styles, types of headshots (3/4, 1/2, 1/4, Full-Body Portraits), angles (not just full frontal headshots), different lighting conditions, various lenses…the more diverse, the better. Focus on the faces unless the character has distinctive body features.
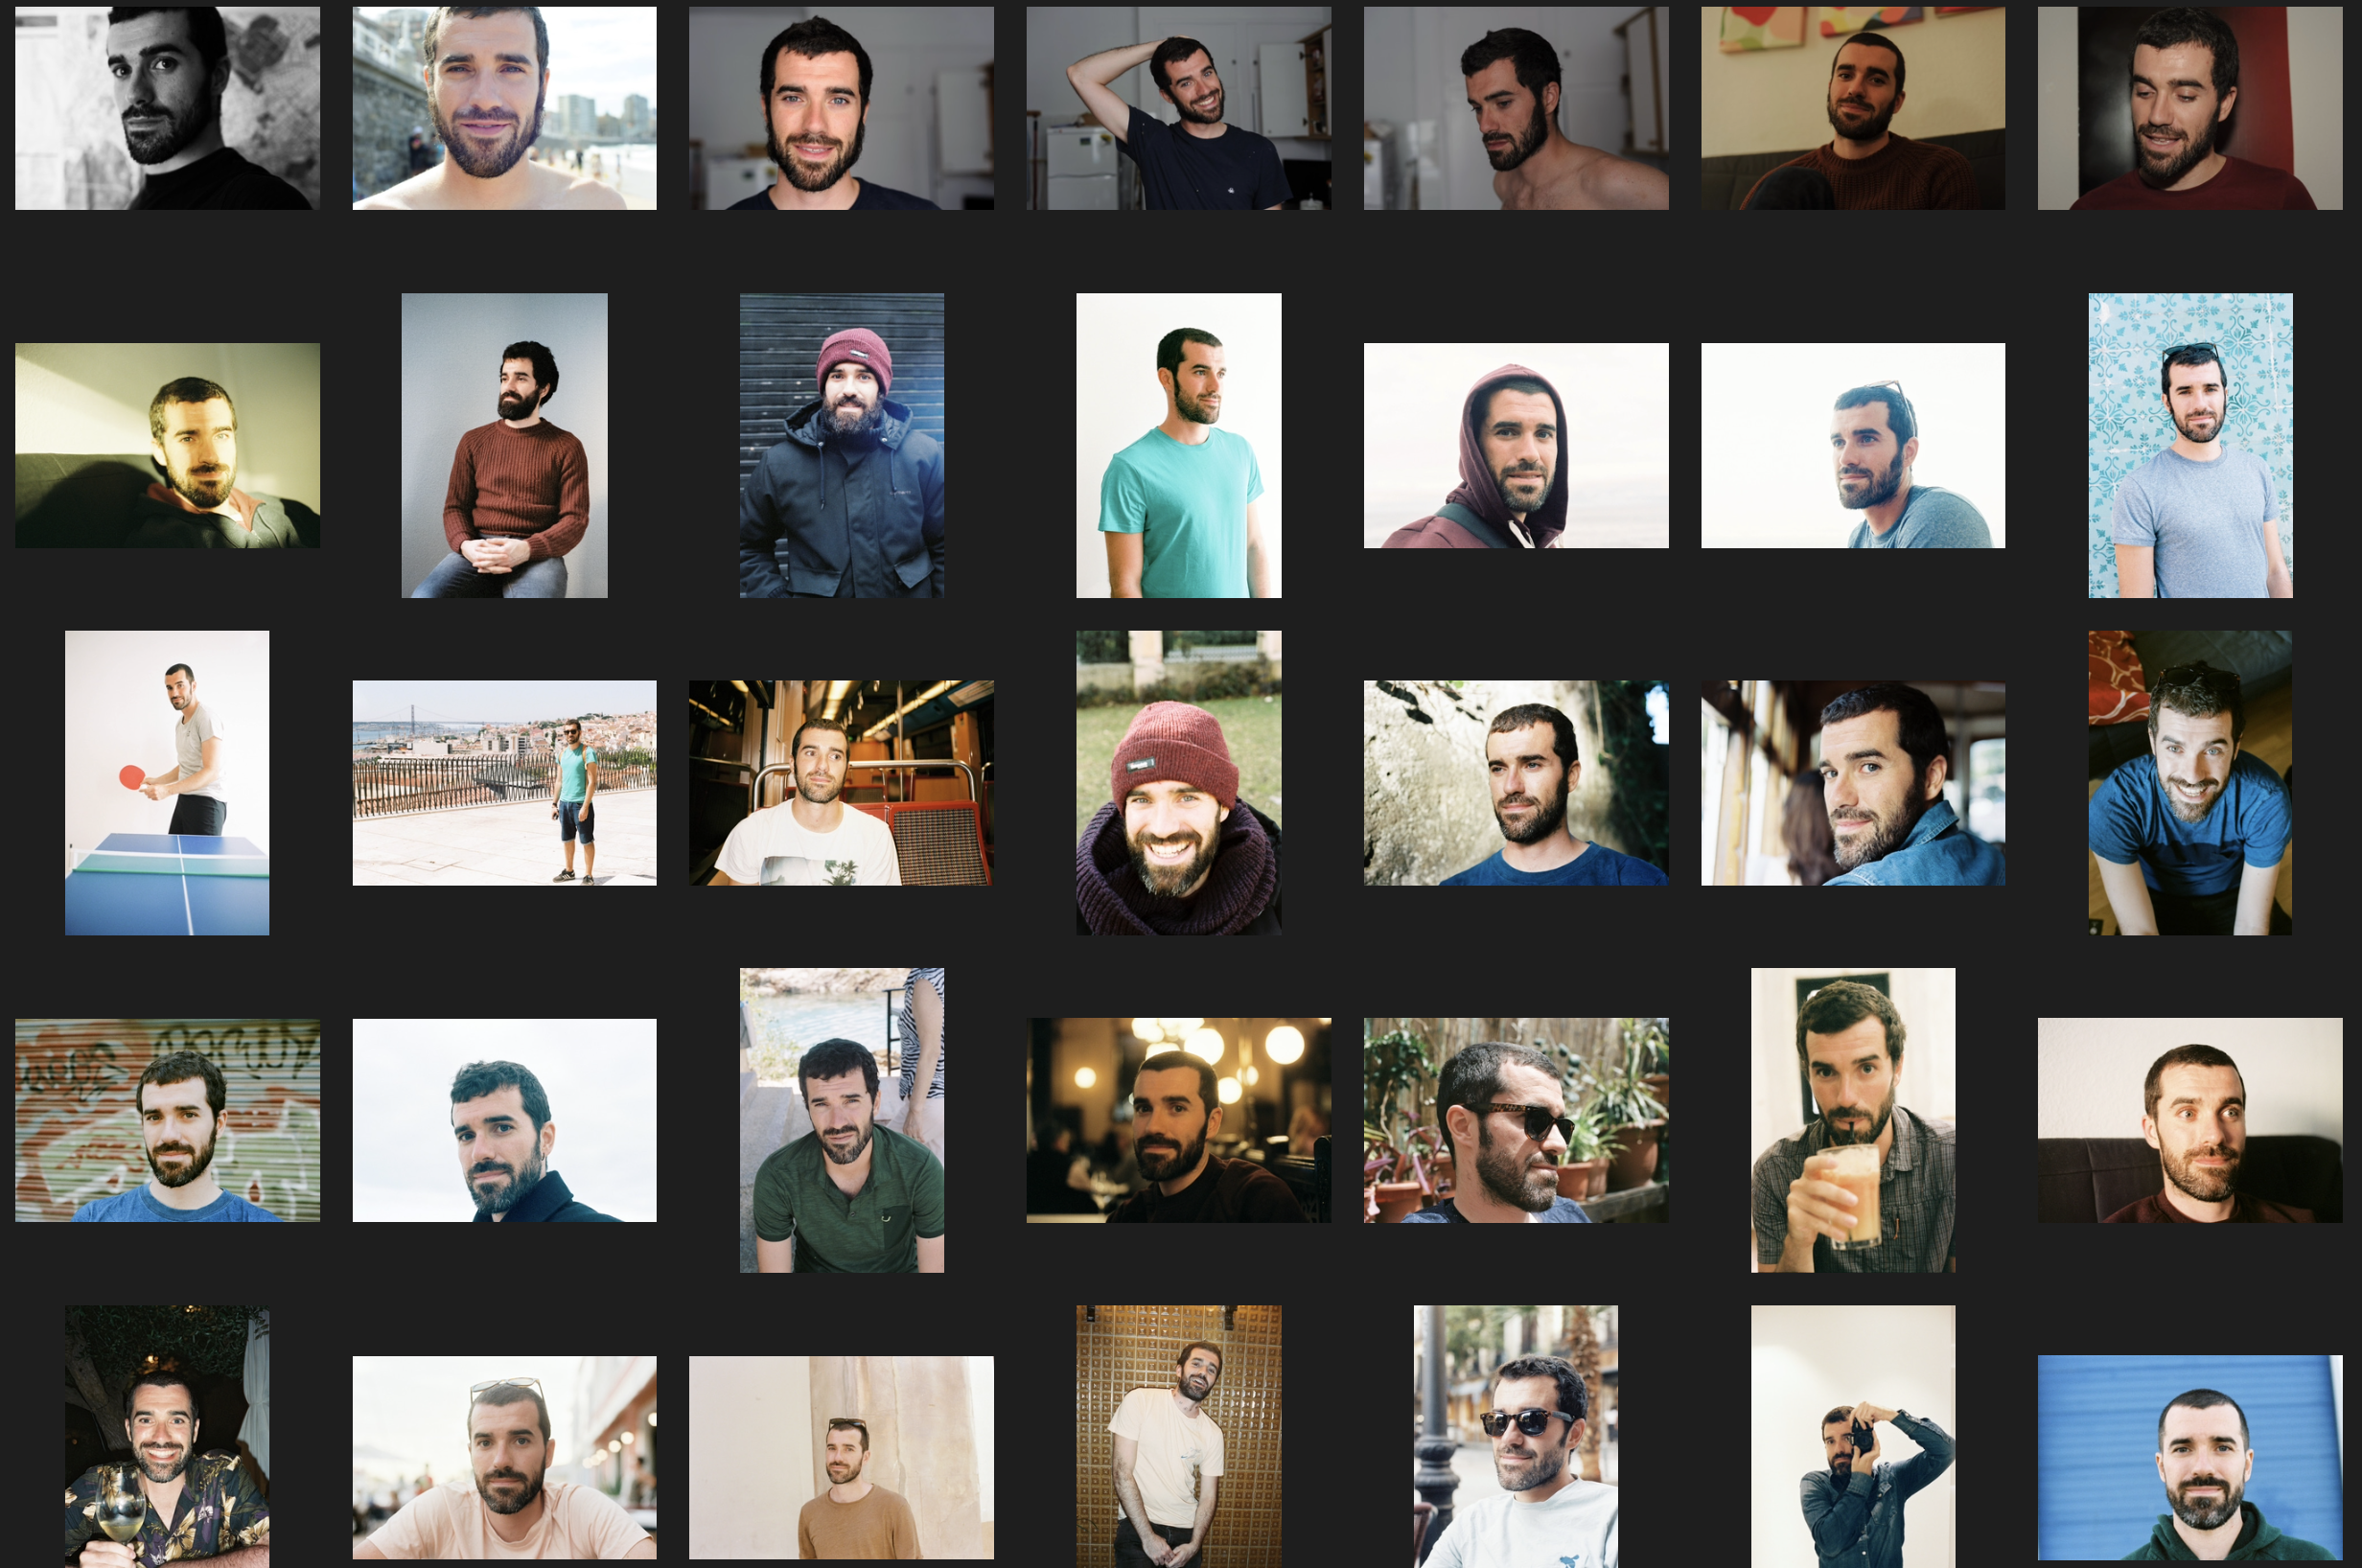
As for the number of images required, I can’t make any scientific claims yet due to limited testing. However, as a passionate photographer, I have an extensive collection of pictures, especially of Violeta. For a LORA of myself, I used approximately 70 images and over 200 for Violeta. In both cases, the results were quite satisfactory. While some claim that 30 images are enough, my personal tests didn’t prioritize efficiency (smaller sample size might reduce training times), and I wanted to include images of us at different ages.
Processing Images
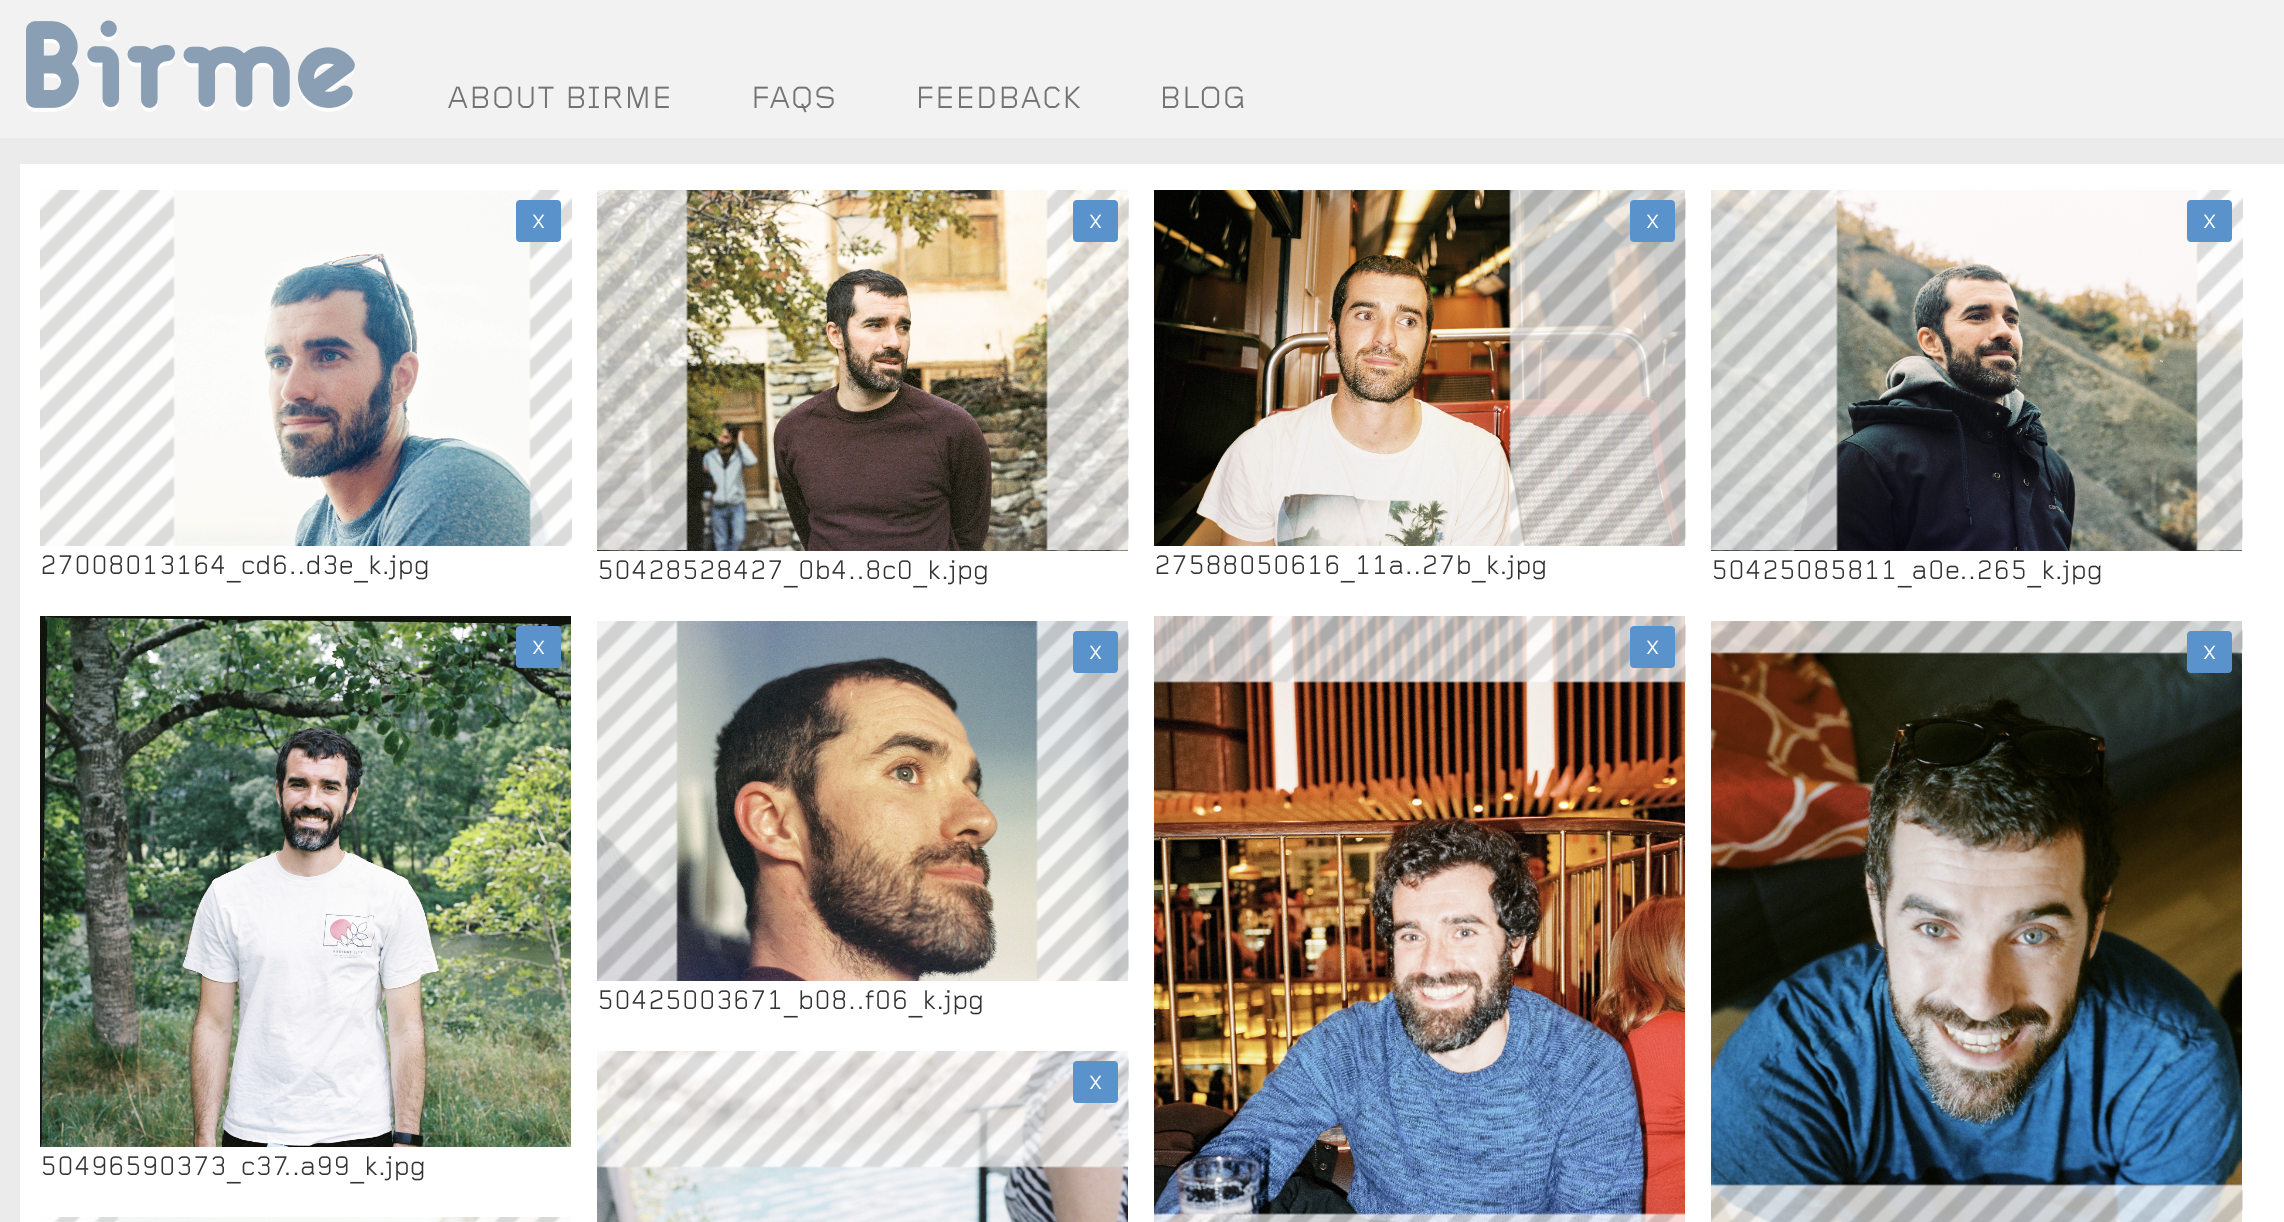
Currently, all my pictures are resized to a resolution of 512x512 - recommended for SD15. My experiments with 512x768 (and 768x512) haven’t shown significant differences in training outcomes. However, some posts suggest maintaining a 1:1 aspect ratio format is beneficial. For cropping and resizing tasks, I use BIRME - an online and free tool.
Captioning
Once you have your folder filled with appropriately sized photos, it’s recommended to caption these images. Although not mandatory, providing good captions is highly encouraged.
Warning
For now, this part of my process is automated but in future I’ll likely manually adjust automatically-generated captions.
Here’s how you can quickly create captions: In Kohya, select the top tab titled Utilities > Captioning and choose a type of captioning. For characters (as they call when you train a Lora with a person or anime), WD14 is said to work better. Select the folder, remove any undesired tags and add a prefix to captions. In my case, I use the trigger word I’ll be using for training the LoRa - something that isn’t known by the base model on top you’ll be training. For me, this is pelarbues - an unlikely real word that helps me identify my character Lora.
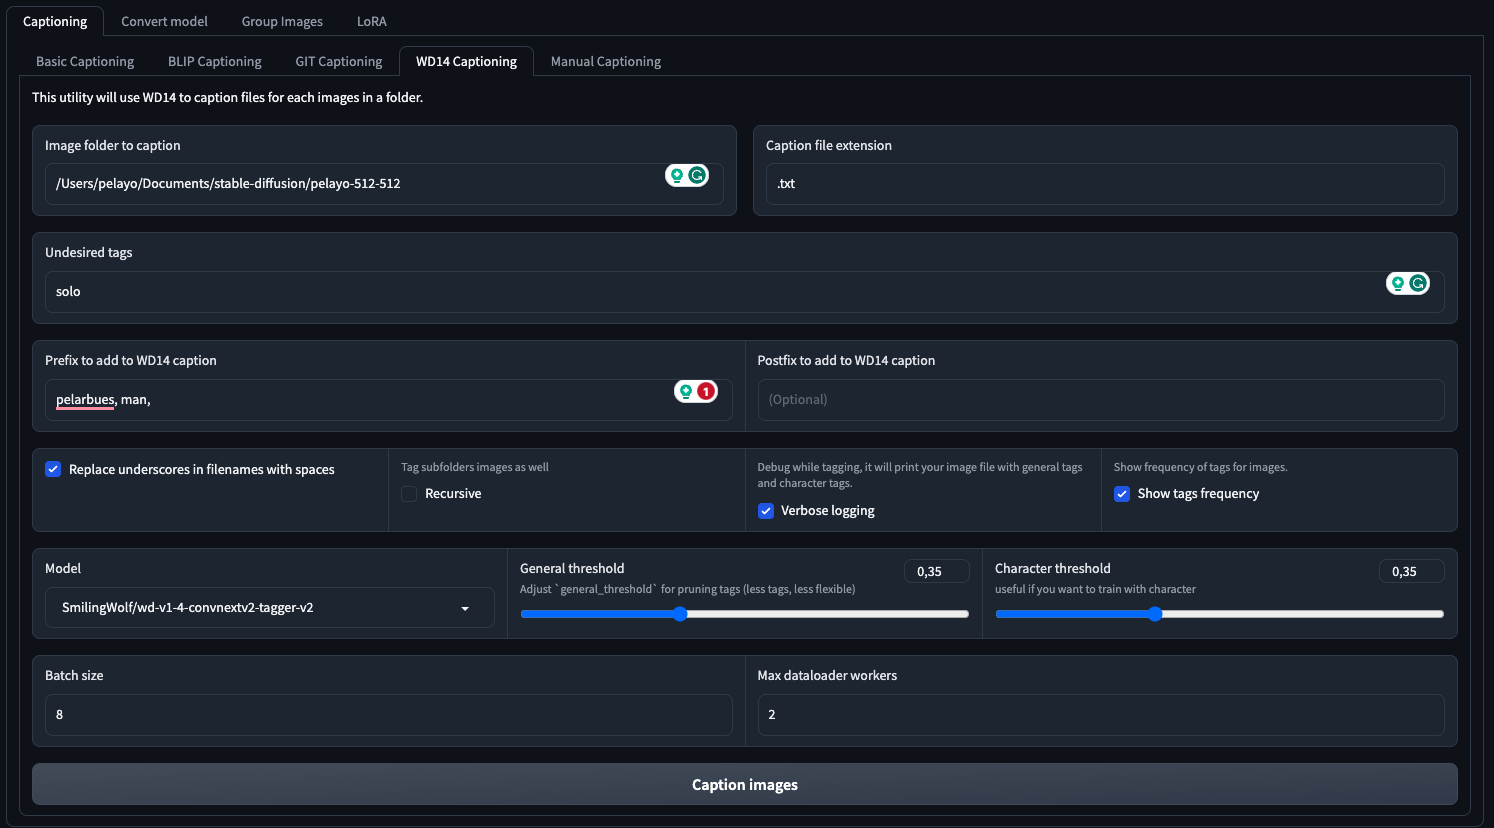
If you want to review the captions, you can use the Automatic1111 extension named Dataset Tag Editor.
Preparing Image Folders
So far, we’ve collected images, resized them to a specific resolution and added captions. Now we need to organize these images into folders in a format recognized by Kohya trainer scripts. This can be done manually as it merely involves pointing to certain folders and specifying the number of image repeats per epoch.
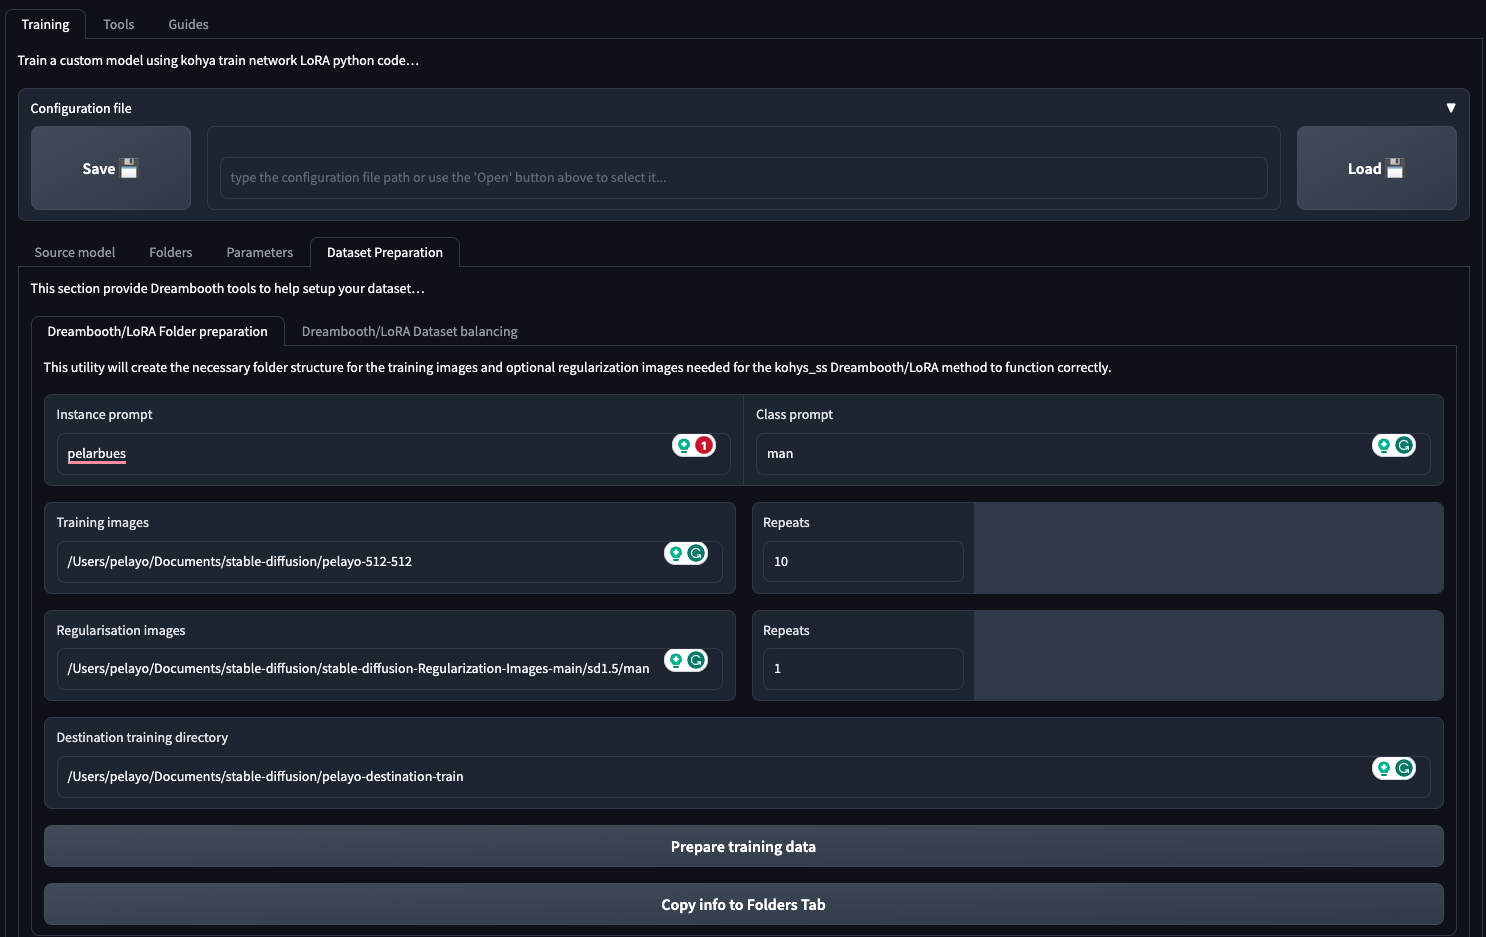
The easiest way is via Kohya’s LoRa tab > Training > Dataset Preparation. Here you’ll need to provide:
- Instance prompt: In my case, this is ‘pelarbues’. I use the class ‘man’, although others suggest using ‘person’ is fine too.
- Training images: Indicate the folder containing your resized training images with captions.
- Repeats: Indicate number of repeats.
- Regularisation images: To avoid overfitting your character, include regularisation images. I’ve used these regularization images repeated once.
- Destination training directory: Simply a path where folders and subfolders will be created for training images, regularisation and other items such as log and models.
With the image preparation complete, let’s move on to LoRa training.
LoRa Training
Now, let’s discuss how to train the LoRa. Please note that I’ll be sharing a configuration that works for me, considering:
- I am using an Apple Silicon device
- I have approximately 70 images
Here is the command and options I used. You can achieve the same using the UI, but personally, I find using the terminal more comfortable at this stage of the process.
accelerate launch --num_cpu_threads_per_process=4 train_network.py \
     --train_data_dir="/Users/pelayo/Documents/stable-diffusion/pelayo-destination-train/img" \
     --reg_data_dir="/Users/pelayo/Documents/stable-diffusion/pelayo-destination-train/reg" \
     --output_dir="/Users/pelayo/Documents/stable-diffusion/pelayo-destination-train/model" \
    --logging_dir="/Users/pelayo/Documents/stable-diffusion/pelayo-destination-train/log" \
    --output_name=pelarbues \
    --training_comment="activated using pelarbues" \
     --pretrained_model_name_or_path="runwayml/stable-diffusion-v1-5" \
    --network_module=networks.lora \
    --prior_loss_weight=1.0 --resolution 512 \
    --train_batch_size="2" --learning_rate=2e-4 \
    --max_train_steps="4500" \
    --lr_scheduler="cosine" --lr_warmup_steps="300"  --lr_scheduler_num_cycles="4" --no_half_vae \
    --network_dim=32 --network_alpha="16" \
    --text_encoder_lr=0.0001 --
Some important things to note:
- For my MacBook, I need to maintain these settings to ensure it functions correctly:
--mixed_precision="no"
--save_precision="float"
--optimizer_type="AdamW"
--no_half_vae- Other significant parameters include:
- Use SD15 vanilla. I haven’t tried other photorealistic models as a base network, but the general advice is to stick with the SD15 base model.
- Networks.lora: There are various types of interesting networks you can train. Check links about Lycoris for more information.
- Network dimension (rank). The network rank specifies the number of neurons in the hidden layer. The larger the number of neurons, the more learning information can be stored. However, this could risk overfitting and also increase LoRa file size. Currently, I am experimenting with a rank of 32 for characters.
- Network alpha prevents weights from being rounded to 0. When setting the Network Alpha, consider its impact on the learning rate. For example, with an Alpha of 16 and a Rank of 32, the strength of the weight used is 16/32 = 0.5, meaning that the learning rate is only half as powerful as the Learning Rate setting.
- Learning rate: This represents how large our steps are when tuning network weights - an important parameter in training networks. If you’re unfamiliar with it, it’s worth learning about.
- Batch size: This refers to the number of images read at once. The larger the batch size, the shorter the learning time, but higher the memory requirements. Increasing the batch size typically calls for a higher learning rate. For example, if the batch size is 2, the learning rate should be doubled.
- Epochs: This refers to a complete round of learning. In my example, I am using 70 images, each read 10 times. One epoch equals 70x10 = 700 training steps. If I use 2 epochs it will be 1400 and so on. It is set by the param
lr_scheduler_num_cycles. According to this video, 1500 is a good number of steps for characters, but I’ve found that 3k or 4k works better. - The ‘Save every N epochs’ option allows you to keep intermediate model checkpoints.
To keep this brief and because explanations are available at LoRA training parameters Wiki, I recommend checking it out if you want to explore other parameters used in my example.
Hints
- Check Tensorboard during training to monitor potential overfitting issues.
- If you’ve chosen to save a checkpoint for each epoch, you can prompt intermediate epochs and review results obtained using different epochs. Don´t blindly rely on loss metrics.
Inference
Currently, I’m using Automatic1111, but some have suggested switching to ComfyUI, a graph-based GUI that’s touted as being more flexible. However, I haven’t made that leap just yet.
It’s essential to familiarize yourself with the GUI before delving into the specifics. This is where an excellent introductory guide to using Automatic1111 comes in handy. Now that we’re all set, let’s create some images with our freshly trained model. I’ll walk you through my current workflow.
Image Generation Workflow
The primary objective is to explore a concept as quickly as possible by generating numerous rough images that mirror what I’m picturing in my mind. These images will have a specific look and feel, pose and atmosphere. From this collection, I select the ones closest to my vision and refine them by upscaling and tweaking until they closely resemble the character.
Before we proceed, I highly recommend installing the Infinite Image Browsing extension. It will significantly aid your image review process.
Without further ado, let’s dive into the workflow.
1. Prompt it Like You Mean it
I kick things off with a straightforward prompt describing the type of portrait: who the character is, what they’re doing, where they are etc. To make it look as good as possible, I also incorporate some photography terms. For instance:
(full body:1.4) of pelarbues man, solo, 1950s candid photo, 1950s office, 1950s office furniture, elegant office suit,scene from mad men, asymmetric face, dark hair, beard, thin, skin pores, focus on face,film grain,volumetric light, shadows, kodak portra 400, <lora:pelarbues:0.7>
For negative prompts (things you don’t want to appear), you might consider something like:
(deformed, distorted, disfigured:1.3), poorly drawn, bad anatomy, wrong anatomy, extra limb, missing limb, floating limbs, (mutated hands and fingers:1.4), disconnected limbs, mutation, mutated, ugly, disgusting, blurry, amputation, deformed legs, mutilated body, (2D), (3D), ((camera)), ((cartoony)), (CGI), ((drawing)), ((lowres)), ((painting)), ((sketchy)), ((The Sims)), (ugly), ((blur)) (worst quality, low quality, normal quality:1.3), lowres
(deformed iris, deformed pupils, semi-realistic, cgi, 3d, render, sketch, cartoon, drawing, anime, mutated hands and fingers:1.4)
Or you can keep it succinct and download negative embeddings that work better with certain model checkpoints. I’ve selected some that have been particularly effective for me.
2. Experiment
Now comes the fun part: experimentation!
- We are going to set 30 sample steps (something between 20-50 might work depending on the checkpoint) And a CFG of 5 (something between 5 and 7 usually do)
- Make sure you have restore faces unchecked! We will fix the faces later on.
- In the bottom of the page we will make use of Script x/y/z that will allows us to plot a grid of different parameters. We are going to put some models to the test, and also samplers and seeds. But you could select sample steps, CFG values or whatever.

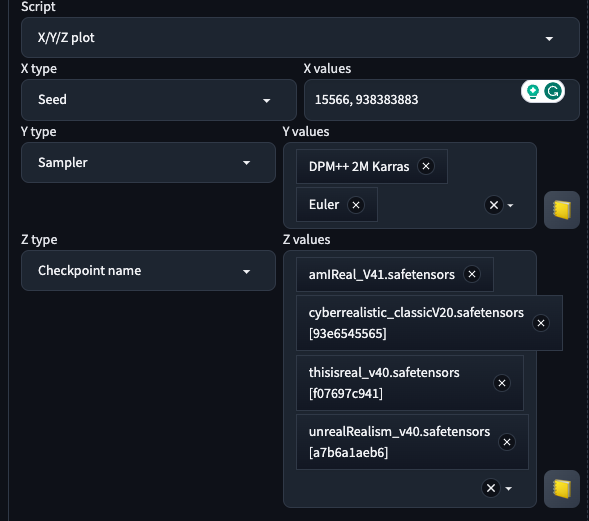 Now run it! It may take a while, but you can grab a coffee and relax in the Infinite Image Browsing tab while your machine does the heavy lifting.
Hints
- Experiment to find your preferred checkpoint and samplers
- Avoid using face restoration initially
- Fine-tune the prompt using other LoRas.
- Upscale using Adetailer + Controlnet
After analyzing the generated images, we can see some issues such as people appearing in the images who shouldn’t be there. We can control this by tweaking the prompt, but for now we can move on.

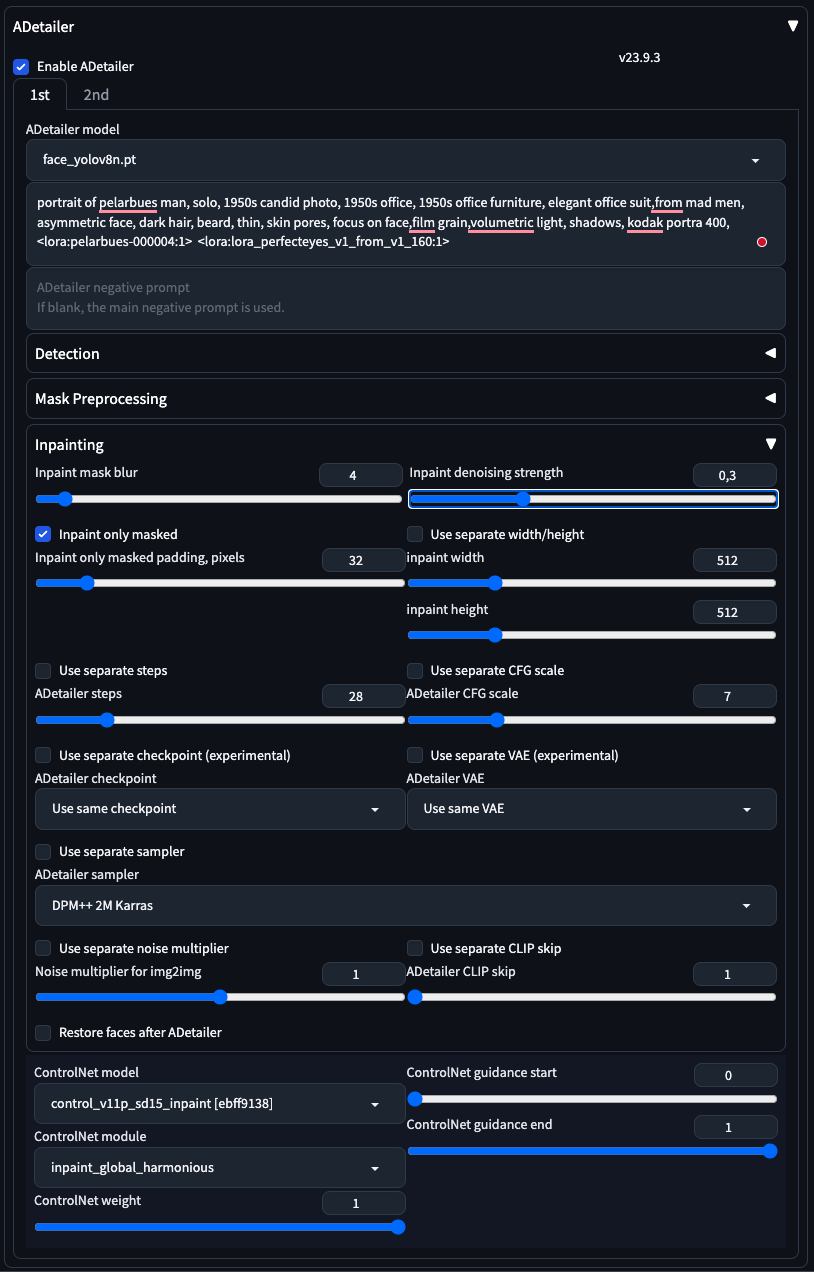
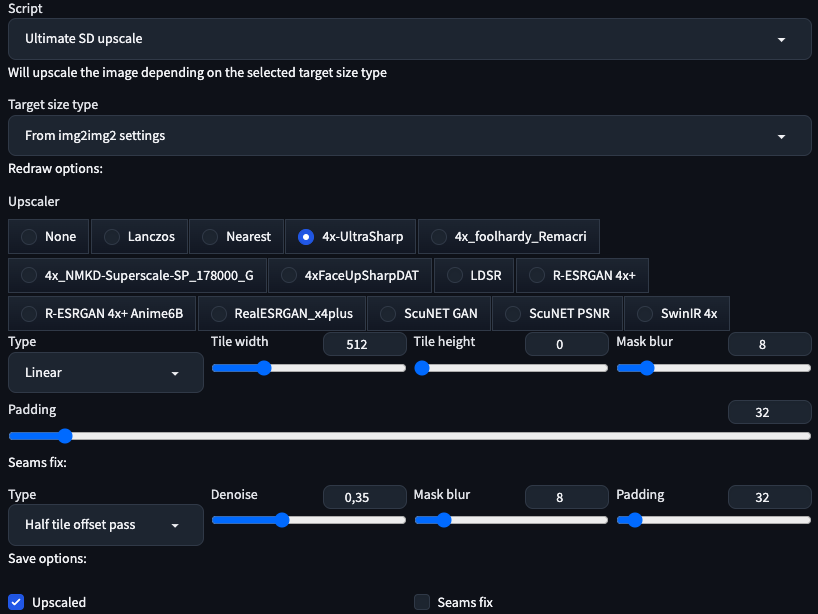
3. Upscale and Fix the Face
To upscale and fix facial features (and hands), we’re going to use a couple of Automatic extensions: !After Detailer with ControlNet for face fixing and Ultimate SD upscale for upscaling.
- Fixing the face and the hands requires some inpainting. We could do this by manually Inpainting in the img2img > Inpaint module, but this is a very manual process. The most important param I usually change es Inpaint Denoising Strength, I keep it between 0.25 and 0.4 for faces and sometimes I go to 0.5 for hands.
Face:
Hands:

- Upscaling: I strongly recommend adding additional upscalers like [[UltraSharp - OpenModelDB]] and 4xFaceUpSharpDAT - OpenModelDB and Remacri.
Final results
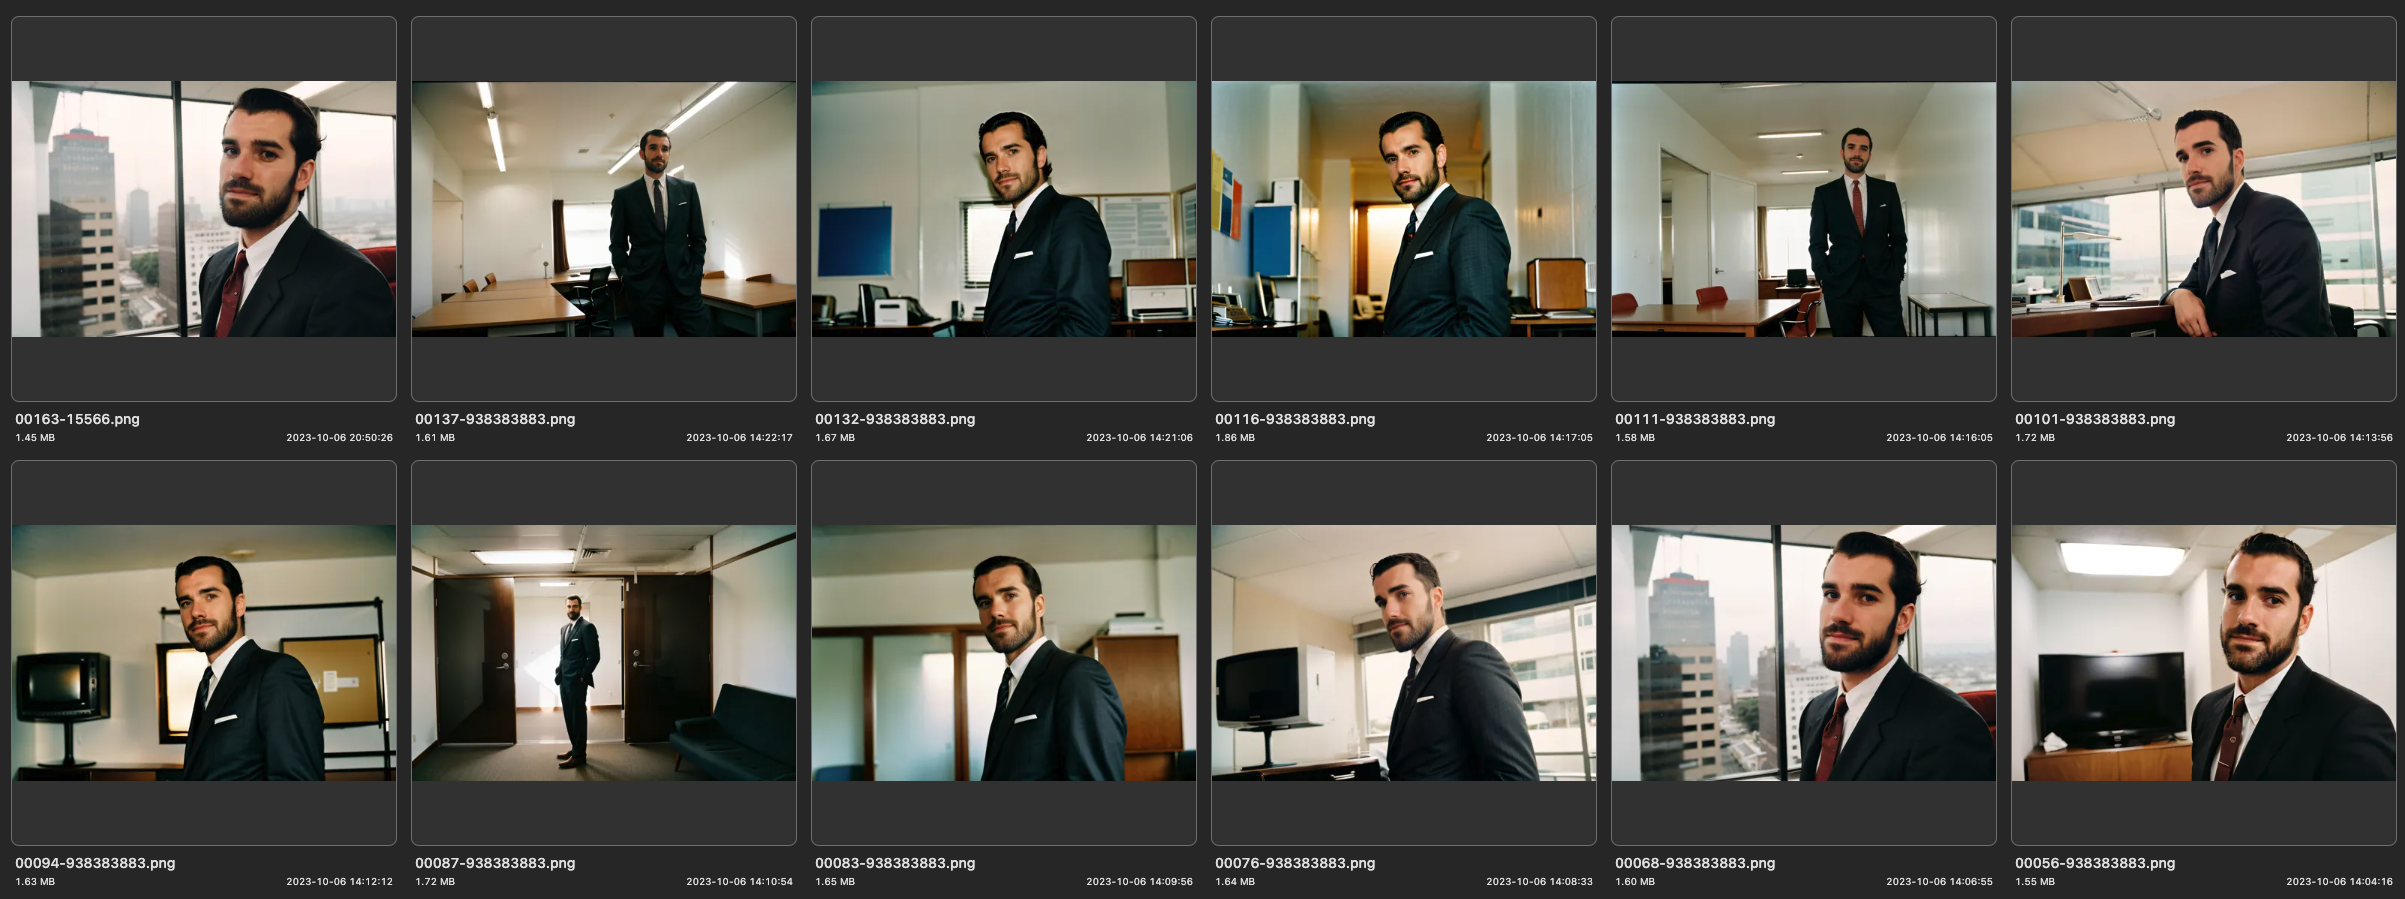
So, here are our final results. Some of them are quite good, but I’m not entirely satisfied with the overall look. In a following post, I’ll discuss how to enhance these images by adding more detail, improving the focus and emulating the film grain.